Screen layout
The main screen of the HortiMaX-Go! is the home screen. The home screen displays a number of fixed elements, such as the tiles, the top bar and the right sidebar.
The exact layout of the home screen depends on your configuration. The screenshot below shows what the home screen may look like on your system.
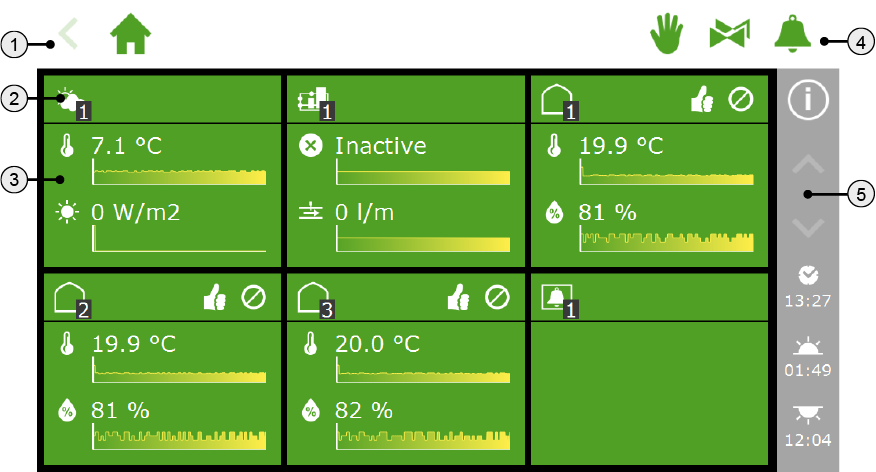
- Top bar with the breadcrumb trail on the left-hand side.

- Tile header Read more
- Tile body with information Read more
- Top bar with direct access to manual control, valves and alarms on the right-hand side.
- Right sidebar Read more
Breadcrumb trail on top bar
The breadcrumb trail shows your current location within the software. Every icon in the breadcrumb trail represents a specific control in the software. Examples are irrigation control and humidity control. If an icon has a number, this indicates which zone or control you are looking at.
Example
The breadcrumb trail leading to the stage control settings for the roof screen might look like this:

In words, this reads: Home screen > Zone 1 > Roof screen 1 > Stage control.
Tap an icon in the breadcrumb trial to go directly to the corresponding tile. Tap the arrow on the far left of the breadcrumb trail to move one step back in the breadcrumb trail.
Tile header
The tile header contains the following information:
- Type of tile There are four types of tiles: weather, irrigation, climate and alarm.
- Control mode The icons on the right-hand side indicate the current operating mode of a control.
- Control status indicated by colour. The tile header can have one of three colours: green, orange and red.
- Stage information The tile header shows information about the active stage.
On the left-hand side of the tile header, you will see the icon of that control along with the zone number.
Type of tile
|
|
Meteo-Go! |
The tile in the upper left corner displays data from the weather station. |
|
|
Irrigation unit |
If you have an irrigation unit, then data from the unit is displayed on the second tile. Under this tile, you will find all the settings relating to irrigation control. |
|
|
Climate zone |
Each climate zone (also known as a greenhouse block or compartment) has its own tile on the home screen. The zone number is indicated in the black box at the bottom right of the icon. Under a zone tile, you will find all the controls that are available for that zone. |

|
Alarm |
The Alarm tile provides direct access to the Alarm contact settings. The Alarm contact is a shared function for all climate zones. |


Control mode
On the right-hand side of the tile header, icons may be displayed with the following meanings:
|
|
The control is set to automatic mode. This means that the system will control that function automatically based on the preprogrammed software settings. |
|
|
The control is set to a fixed position. |
|
|
No connection could be established with the hardware associated with that control. This is a serious situation that will trigger an alarm. |


Colours
The tile header can have one of three colours: green, orange and red.
|
|
Green |
If the header is green, then the control is active and the situation is normal. Controls can be set to automatic mode or set to a fixed position. |
|
|
Orange |
If the header is orange, then a system in one of the underlying levels has been set to manual control. As a result, the controller is unable to control the connected equipment automatically. This could cause a hazardous situation, because overrides (e.g. rain or gale overrides) will not be applied. |
|
|
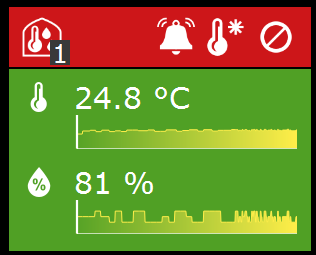
Red |
If a tile header turns red, it means that an alarm has been triggered. In that case, the bell icon is displayed on the right-hand side. |


Stage information
The tile header shows the active temperature stage.
|
|
Heating stage |
The zone temperature is below the desired temperature; the zone needs to be heated. |
|
|
Neutral stage |
This is the desired temperature. |
|
|
Cooling stage |
The zone temperature is above the desired temperature; the zone needs to be cooled. |


Tile body
The tile body shows readouts and trend graphs. The readouts show the main readout values for the control in question. If you tap the tile and then open the readout screen  , you can view all the current readouts for that control.
The trend graphs show the relative trend over the last 2 hours. For more detailed information on a certain readout value, open the graphs program by tapping this icon:  .
.
In the irrigation program, the tile bodies show other information. At the top, information on the next irrigation cycle (date and time) is displayed. At the bottom, information on the last irrigation cycle (volume or time) is displayed:
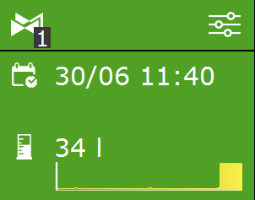
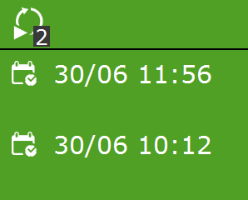
Figure 1: Irrigation tiles
Icons on top bar
A number of icons are shown on the right-hand side of the top bar. Tap one of these icons to go directly to the corresponding screen. The following icons may be shown here:
|
|
Fixed position control |
The fixed position screen provides an overview of the controls that are available for the zone you have selected. For each control, you can either set a fixed position or select automatic mode. If you select automatic mode, then the controller will use the settings defined for stage control. |
|
|
Valve group (manual start control) |
The screen for manual valve group control displays information about the status of the valves in each valve group. It also includes a start button to activate a valve group immediately (this is called a 'manual start'). |
|
|
Alarm screen |
The alarm screen displays all active alarms. The bell icon shows the number of active alarms and whether the system bell is active. |


Right sidebar
The bar on the right-hand side of the screen always displays the same information. It enables you to access a number of basic settings.
|
|
Help This is the help button. It enables you to do the following:
|
|
|
Arrow up If this button is active (white), more information is available above the information displayed.
|
|
|
Arrow down If this button is active (white), more information is available below the information displayed.
|
|
|
System time This displays the current time. This button enables you to do the following:
|
|
|
Sunrise The time that the sun will rise today. |
|
|
Sunset The time that the sun will set today. |